Both Azure DevOps and GitHub are supported Git hosts for Power BI and Fabric workspace integration. I will demonstrate using GitHub rather than Azure DevOps because, it is free for personal use. Getting started with GitHub is quite easy, and anyone can have a free GitHub account. Simply navigate to http://GitHub.com and sign-up for an account. You may create a personal or organizational account, and your personal account can be associated with multiple organizations.
After you have an account, sign-in and create a new repository (repo). A repo may be public or private and can, optionally, be part of an organization. This is the Create a new repository page in GitHub.
Each repo generates a URL with the owner or organization name and the name of the repo. Since I created this as a public repo, you can access it by navigating to http://GitHub.com/paulturley/AirlinePerformance. It’s as easy as that!
GitHub provides excellent documentation and support resources on the website and I recommend that you familiarize yourself with these resources to learn about basic functionality and site navigation. We only need basic functionality so don’t get lost in the details.
Install the GitHub distribution
To run Git commands on your local computer, you will need to install some components that you can download from the GitHub web site. GitHub documentation will take you to the site at: https://git-scm.com. Download and install the Git for Windows and follow the prompts. You might need to reboot your computer after the installation is complete.

Create a local repo folder
It is a good idea to designate a folder on your local machine to store your local repos. This can be anywhere you like, and opinions vary. If you want to store them on a cloud-backed folder for safe-keeping, that’s fine. I am of the opinion that since local repo folders will be backed up with GitHub online, there is no need to store them in my OneDrive synched folders, so I just designate a folder on my C: drive. It certainly won’t hurt to have the file back-up twice, so if you prefer to create a folder on another drive, or under your Documents folder, that’s fine. You do you.
The GitHub Repos folder on my C: drive contains each of the local repo folders I have created for different projects. The AirlinePerformance folder contains the files for our project and local Git repo.

After creating the repo on the GitHub website, GitHub provides some setup instructions. Read ahead before following these instructions as you have a couple of options.

Creating the local repository
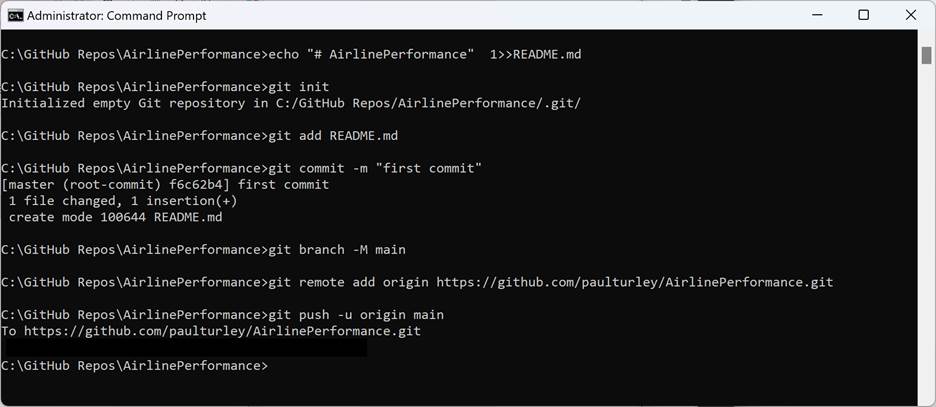
The setup documentation on this page provides instructions for using console commands to initiate and use a repo. At this point, you have some options. Even Windows version management tools like GitHub Desktop run these console commands behind the scenes and some IT professionals prefer to work with command-line tools rather than GUI tools. This choice is up to you. I’ve always used GitHib Desktop to initiate a new repo, and you can skip the command line steps if you prefer to do the same. We’re not going to get into the Git command details because that’s not the purpose of this book and the Git commands are well documented on GitHub. You can manually execute the same console commands that would be executed by GitHub Desktop.
GitHub Desktop simplifies the process. After signing into your GitHub account, choose Clone repository from the File menu and choose the online repo. You can also copy the URL for any GitHub repo and paste the address using the URL tab. Enter or navigate to the local folder and click Clone.

The results are here in Windows File Explorer. A hidden .git folder is created in the repos root folder and in each project repo folder to manage the Git metadata. A README.md file is required to initialize a repo but no specific text or content is required. The file simply needs to exist in this folder. The purpose of a README.md file is to document the project using text with simple markdown tags. This file typically contains a project description, brief instructions and contact information. The .gitignore file may be used to list files to be excluded from the online repo. Power BI Desktop updates this fie to exclude the local settings and semantic model data cache.
You can update the .gitignore file to exclude other local files that don’t need to be saved online. For example, if you want to keep a copy of the original .pbix file that was used to save your work to a Power BI Project (.pbip), that file could be excluded, especially if it is a large file.

Managing the Project with Visual Studio Code
To edit and manage version changes, we can open the project folder using Visual Studio Code (VS Code). Project files are displayed using the Explorer pane, organized in a hierarchy. Code is inspected and updated in the file editor with several advanced editing capabilities.

On its own, VS Code is really a glorified text editor. Specialized features are added to VS Code using a vast library of opensource extensions to enable specific commands and language enhancements for different types of projects. You can find and install these from the Extensions option on the View menu. To enable version management commands for GitHub, I am installing the GitHub Actions and GitHub Pull Requests extensions.

I can now commit any changes to the GitHub online repository for this project. Code branches enable a developer to contain and manage all their code changes until they are committed and merged back into the main branch. The current branch is displayed in the lower-left side of the status bar. I have created a new branch to contain my changes, named PTurley_ModelUpdates01. Any file changes on my local computer, made using Power BI Desktop, Tabular Editor, VS Code or any other application, will be tracked in this branch.
After saving any changes, the option to commit those changes to the repo is displayed in the Source Code pane. A commit message should always accompany the commit action. I enter a brief explanation for the commit message and click the Commit button.

Merging and Resolving Conflicts
The concepts of version control on the surface may seem simple but it can be a complicated process when multiple developers are making changes to the same files and project assets. GitHub and every Git hosting framework have an extensive set of commands and features use to isolate and orchestrate file changes. When a conflict arises, files can be compared, and then appropriate action may be taken to resolve the conflict and update the repo with the right code. This book is not about the nuances of versioning and conflict resolution, so we are not going to get into those details. There are plenty of good resources to learn this process.
In this scenario, I had previously made a change to some measure logic in the semantic model and saved it directly to the service. Because the workspace is under Git version control, this change is tracked in the repository and Git is aware of the change. I also made a change to the same code here in my local repo so when I committed my code, VS Code alerted me to a conflict. The code editor shows both changes to the same measure.

At his point I can correct the code, reject the changes, or select one of the changes and then merge the change back into the branch. I decided the accept the most recent change.
Synching Changes
When the local and online repositories don’t contain exactly the same file versions, the developer is prompted to sync changes with their local repository. This action pushes and pulls changes to make sure they have the latest files in the branch. The Synch changes button displayed on the Source Control pane. Note the diagram showing the conflict resolution and my previous commit history. This indicates that the branch is in a consistent state and has been synchronized with my local code

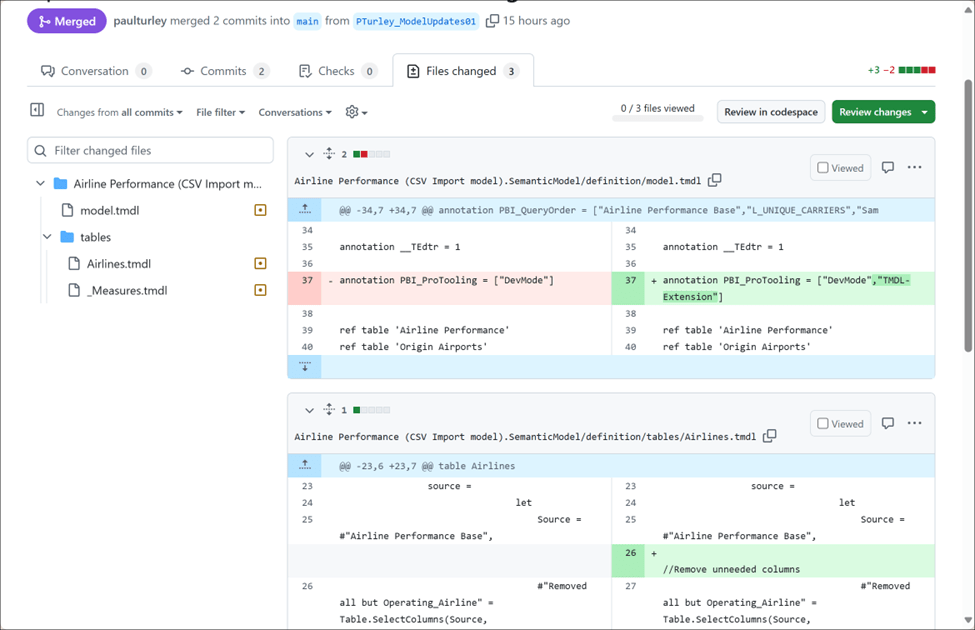
Branches may be compared and merged using GitHub in the web browser. Code from two committed branches compared side by side. When a branch is ready to be merged, the developer or any member of the team creates a pull request. In large, formal projects, a pull request can kick-off an approval workflow which requires a tester and approvers to sign-off before the branched code can be merged into the main branch. In small, less-formal projects, a developer can simply review the changes and merge the code. After the changes are merged, the source branch can be deleted or used later for additional changes.
After merging changes to the main branch, the new version can be deployed to your development workspace. If the workspace has Git integration enabled, you will see these changes in the workspace version control and you can synch them from the browser.
You have seen how Power BI can be used with version control and continuous integration and delivery tools. If your team uses Azure DevOps rather than GitHub, the experience will be similar. The CI/CD story for Power BI took several years to evolve but now that it is a reality, Power BI can participate in the full development lifecycle of an enterprise-scale solution.
Applying version control, CI/CD and DevOps with Power BI projects can range from simple to complex, with a few options and decision points. The right fit for your team will depend on factors such as the scale of your data solution, size of your team, and IT development culture in your organization. Microsoft provides addition guidance in this article: https://learn.microsoft.com/en-us/fabric/cicd/best-practices-cicd.

2 thoughts on “Setting up a GitHub Repo and Power BI Project”